Institutional Buying %This is an Institutional Footprint Detector that identifies when large traders (institutions, hedge funds, market makers) are actively accumulating or distributing. Unlike retail-focused indicators, it detects the specific signatures institutions leave in the market:
Absorption (high volume, low movement)
Liquidity grabs (stop hunts)
Volume delta (buying vs selling pressure)
Hidden divergences (smart money disagreeing with price)
What it catches: Sustained institutional accumulation
Directional conviction with volume
When smart money is aggressively buying/selling
Divergences:
Hidden bullish div: Price makes lower low, but delta makes higher low
Translation: "Price falling but institutions secretly buying"
Hidden bearish div: Price makes higher high, but delta makes lower high
Translation: "Price rising but institutions secretly selling"
Absorption
Example: Price at support: $100
Volume: 3x average
Range: Only $0.50 movement
Close up → Bullish absorption (institutions eating supply)
What it catches:
Institutions absorbing supply without moving price
Stealth accumulation at support
Distribution at resistance
Classic "they're loading the boat" behavior
ATR-adaptive zones: Works on crypto, stocks, futures automatically
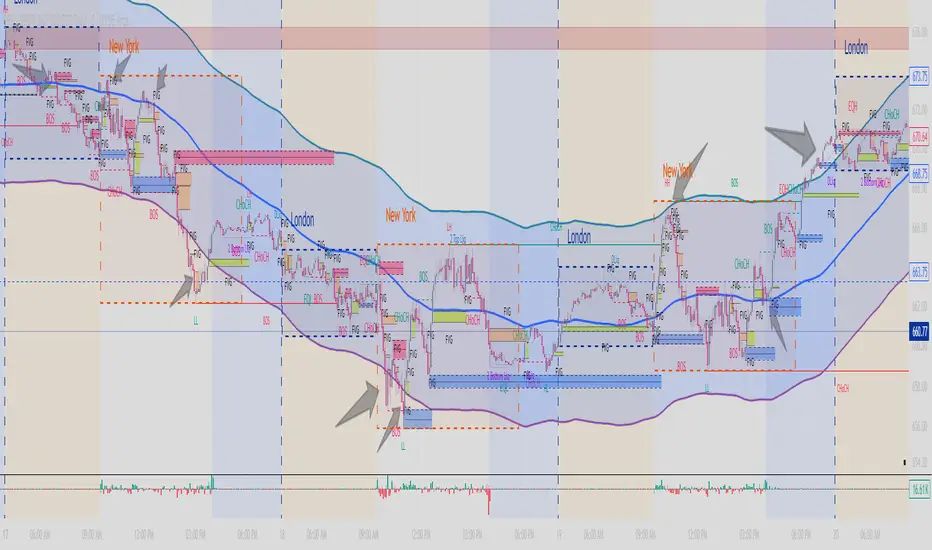
Liquidity Grabs
Example: Recent low: $98
Price spikes to $97.50 (breaks low, triggers stops)
Strong wick recovery, closes at $99.50
Bullish grab → Institutions hunted stops, now buying
Filters: Wick must be >1.2x opposite wick (real rejection)
Range expansion (filters inside bars)
Volume confirmation
This is pure market manipulation detection
Higher timeframe institutional flow Confirmation
Purpose:
Prevents trading against the institutional trend
Acts as a confirmation filter, not primary driver
"Don't fight the bigger money"
Adjustable: 5% for pure signal, 15% for strong trend following
How to Read the Signals
The Histogram (Main Display)
Green Zone (>65%): Strong institutional buying
All 4 components aligned bullish
Safe to be long-biased
Look for entries on pullbacks
Orange Zone (35-65%): Neutral/Consolidation
Mixed signals
Institutions not committed
Wait for clarity
Red Zone (<35%): Strong institutional selling
All 4 components aligned bearish
Reduce longs, consider shorts
Institutions distributing
Background Highlights
Lime Background: Bullish divergence detected
Hidden accumulation happening
Price may be about to reverse up
Major signal - institutions disagree with price decline
Red Background: Bearish divergence detected
Hidden distribution happening
Price may be about to reverse down
Major signal - institutions disagree with price rally
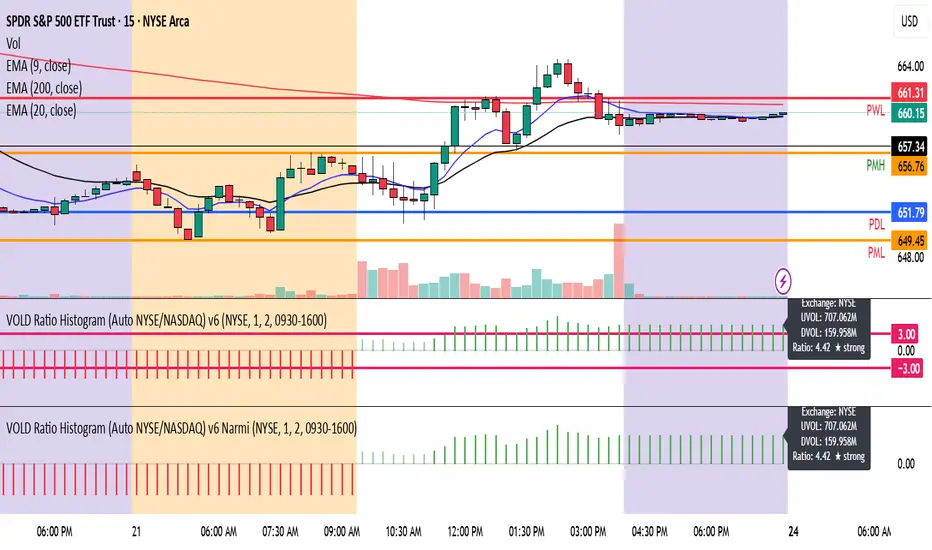
Optional: Cumulative Delta Line
Shows session-level institutional flow:
Rising line → Net buying pressure this session
Falling line → Net selling pressure this session
Resets daily (or your chosen session boundary)
Use: Confirms the histogram direction with intraday flow
How to Trade With It
Setup 1: Divergence + Absorption (Highest Probability)
Wait for divergence background (lime or red)
Check if absorption is occurring (enable debug plot for absorption Percent)
Enter when histogram crosses into green/red zone
Example: Price falling, making lower lows
Lime background appears (bullish divergence)
Histogram crosses above 65%
Entry: Go long, institutions are accumulating
Setup 2: Liquidity Grab Reversal
Price breaks obvious support/resistance
Strong wick rejection appears
Histogram confirms direction (green for bullish grab, red for bearish)
Example:
Price breaks $100 support, hits $99
Long lower wick, closes $101
Histogram >65% green
Entry: Long, stop hunt complete
Setup 3: HTF Alignment (Trend Following)
Set HTF to 240min or Daily
Increase HTF weight to 10-15%
Only trade when histogram aligns with HTF
Example: Daily timeframe shows strong accumulation
On 15min chart, wait for histogram >65%
Entry: Long on any green bar
Setup 4: Session Reset Play (Day Traders)
Enable cumulative delta plot
At session open, watch for delta direction
Enter when histogram confirms
Example: Market opens
Cumulative delta immediately spikes positive
Histogram moves into green zone
Entry: Long, institutions showing hand early
Best Practices
✅ DO: Wait for histogram to cross thresholds clearly
Trust divergences - they're ±35 point boosts for a reason
Use HTF as confirmation filter, not primary signal
Tune divergence sensitivity per instrument
Combine with price action at key levels
❌ DON'T: Trade in orange zone (institutions not committed)
Ignore divergence backgrounds (major signals)
Fight histogram when it's strongly green/red
Use on extremely illiquid assets
Enable all debug plots on 1min charts (lag)
This indicator gives you institutional x-ray vision. When the histogram is green, the big money is buying. When it's red, they're selling. The divergences show you when they're doing it secretly. Trade with them, not against them.
The label on the price scale shows the current Institutional Buying Percentage - it's a real-time reading of the indicator value.
What the Number Means
The label displays a value between 0 and 100:
Example readings:
75 (Green) → Institutions are strongly buying 75% buying pressure vs 25% selling pressure
All components (delta, absorption, liquidity, HTF) aligned bullish
Safe to be long-biased
50 (Orange) → Neutral/Balanced Equal buying and selling pressure
Institutions not committed either way
Wait for clarity before entering
25 (Red) → Institutions are strongly selling 25% buying pressure vs 75% selling pressure
All components aligned bearish
Reduce longs, consider shorts
Wskaźnik Pine Script®