CAPEX//@version=6
indicator("美光 CapEx 噴發追蹤器", overlay=true)
// --- 輸入設定 ---
threshold = input.float(20.0, title="CapEx 噴發閾值 (%)", minval=1.0)
lookback = input.int(4, title="對比前幾季", minval=1)
// --- 取得財務數據 (資本支出 - 季度) ---
// 使用 request.financial 抓取美光的資本支出 (Capital Expenditures)
capex = request.financial("NASDAQ:MU", "CAPITAL_EXPENDITURES", "FQ")
// --- 計算變動率 ---
// 因為財務數據在圖表上是階梯狀的,我們取當前有效值
current_capex = nz(capex)
prev_capex = nz(capex )
// 計算增長率 (注意:capex 在財報是負數,所以我們取絕對值來計算)
capex_growth = (math.abs(current_capex) - math.abs(prev_capex)) / math.abs(prev_capex) * 100
// --- 判斷噴發條件 ---
is_surge = capex_growth >= threshold
// --- 繪製視覺效果 ---
// 當 CapEx 噴發時,背景顯示紅色 (代表擴產警訊)
bgcolor(is_surge ? color.new(color.red, 85) : na, title="CapEx 噴發區間")
// 在圖表下方標註文字
plotshape(is_surge, style=shape.labelup, location=location.bottom, color=color.red, text="CapEx 激增", textcolor=color.white, size=size.small)
// --- 儀表板 (選用) ---
var table tb = table.new(position.top_right, 2, 2, bgcolor=color.new(color.black, 70), border_width=1)
if barstate.islast
table.cell(tb, 0, 0, "本季 CapEx:", text_color=color.white)
table.cell(tb, 1, 0, str.tostring(current_capex / 1e9, "#.##") + " B", text_color=color.red)
table.cell(tb, 0, 1, "較上季增長:", text_color=color.white)
table.cell(tb, 1, 1, str.tostring(capex_growth, "#.##") + "%", text_color=is_surge ? color.red : color.green)
Wskaźniki i strategie

Futures Ultra CVD (Pure )Futures Ultra CVD (Pure)
Futures Ultra CVD (Pure) is a volume-driven Cumulative Volume Delta (CVD) indicator designed to expose real buying and selling pressure behind price movement. Unlike price-only indicators, this script analyzes how volume is distributed within each bar to determine whether aggressive buyers or sellers are in control, then tracks how that pressure evolves over time.
This version is intentionally pure and ungated: it does not rely on external symbols, market filters, session bias, or macro confirmation. All signals are derived strictly from price, volume, and delta behavior of the active chart, making it suitable for futures, equities, crypto, and FX.
Core Concept: How CVD Is Calculated
For each bar, volume is split into buying pressure and selling pressure using the bar’s price position:
Buying volume increases as price closes closer to the high
Selling volume increases as price closes closer to the low
The difference between buying and selling volume forms Delta:
Positive delta = net aggressive buying
Negative delta = net aggressive selling
This delta is then accumulated into Cumulative Volume Delta (CVD) using one of three user-selectable modes:
Total – running cumulative sum of all delta values
Periodic – rolling sum over a fixed lookback period
EMA – smoothed cumulative delta using an exponential average
This flexibility allows traders to choose between raw order-flow tracking or smoother, trend-like behavior depending on timeframe and instrument.
Visual Structure & Histogram Logic
The CVD is displayed as a column histogram, not a line, to emphasize momentum and pressure shifts.
Enhanced coloring provides additional context:
Brighter green/red bars indicate increasing momentum
Muted colors indicate stalling or weakening pressure
Optional footprint-style highlights appear when buy or sell volume overwhelms the opposite side by a user-defined imbalance factor
This allows traders to visually distinguish:
Strength vs weakness
Continuation vs exhaustion
Absorption and aggressive participation
Built-In Order Flow Signals
The script automatically detects and labels key order-flow events:
Strong Delta
Triggered when delta exceeds a user-defined threshold, highlighting unusually aggressive buying or selling.
Delta Surge
Detects sudden expansion in delta compared to the prior bar, often associated with breakout attempts or liquidation events.
Zero-Line Crosses
Marks transitions between net bullish and bearish participation as CVD crosses above or below zero.
CVD Continuation Logic (Trend Confirmation)
Beyond raw delta, the script evaluates CVD structure to identify continuation conditions:
A bullish continuation requires:
Positive and rising CVD
Strong buy delta
Confirmation from at least one of the following:
CVD above its EMA and SMA
Bullish price expansion
Sustained positive delta pressure
Bearish continuation follows the inverse logic.
These continuation signals are designed to confirm participation strength, not predict reversals.
Conflict Detection (Divergence Warning)
The indicator also flags conflict conditions, where:
Strong buying occurs while CVD remains negative
Strong selling occurs while CVD remains positive
These scenarios often precede failed breakouts, absorption zones, or short-term reversals and can be used as cautionary signals.
Alerts & Practical Use
All major events include built-in alerts:
Strong delta
Delta surge
CVD continuations
Zero-line crosses
Buy/sell imbalances
Conflict signals
Alerts can be set to trigger on bar close or intrabar in real time, depending on trader preference.
How Traders Typically Use This Indicator
Confirm breakouts with delta participation
Validate trends using CVD continuation instead of price alone
Identify absorption or exhaustion via conflicts and imbalances
Combine with price structure, VWAP, or market profile tools
This script is not a trading system by itself. It is a decision-support tool designed to reveal what price alone cannot: who is actually in control of the market.
On-Chart Symbols & What They Mean
This script uses a small number of visual symbols to communicate order-flow events clearly and consistently. All symbols are derived directly from the Cumulative Volume Delta calculations described above.
Δ+ (Green Up Arrow)
Strong Buy Delta
Indicates that buying pressure on the current bar exceeded the Strong Delta Threshold
Represents aggressive market buying dominating selling volume
Often appears during breakouts, trend acceleration, or initiative buying
This symbol does not imply direction by itself; it only confirms strong buyer participation.
Δ− (Red Down Arrow)
Strong Sell Delta
Indicates that selling pressure on the current bar exceeded the Strong Delta Threshold
Represents aggressive market selling dominating buying volume
Often appears during breakdowns, liquidation events, or initiative selling
Like Δ+, this symbol measures participation strength, not trade direction.
↑ (Green Label Up)
CVD Bullish Continuation
Appears when all of the following are present:
CVD is positive and increasing
Strong buy delta is detected
At least one confirmation condition is met:
CVD is above its EMA and SMA
Price shows bullish expansion
Consecutive positive delta bars (sustained buying pressure)
This symbol highlights trend continuation supported by volume, not a reversal signal.
↓ (Red Label Down)
CVD Bearish Continuation
Appears when:
CVD is negative and decreasing
Strong sell delta is detected
At least one confirmation condition is met:
CVD is below its EMA and SMA
Price shows bearish expansion
Consecutive negative delta bars (sustained selling pressure)
This indicates bearish continuation with participation confirmation.
Cyan / Orange Histogram Bars
Footprint-Style Volume Imbalance
Cyan bars indicate buy volume exceeds sell volume by the imbalance factor
Orange bars indicate sell volume exceeds buy volume by the imbalance factor
These bars highlight areas where one side is overwhelming the other, often associated with absorption, initiative moves, or failed auctions.
Bright vs Muted Histogram Colors
CVD Momentum State
Bright colors = CVD increasing in the direction of its current bias
Muted colors = CVD losing momentum or stalling
This allows quick visual identification of strengthening vs weakening participation.
Conflict Alerts (No Symbol by Default)
Delta vs CVD Disagreement
These conditions trigger alerts (but no fixed chart icon):
Strong buying while CVD remains negative
Strong selling while CVD remains positive
Conflicts often signal absorption, trap conditions, or short-term exhaustion.
Important Usage Notes
All symbols are informational, not trade entries.
Signals are calculated from price-based volume distribution, not true bid/ask data.
Results depend on the quality of volume data provided by the exchange and TradingView.

V-Max: Tactical Clock & Real-time Price🛡️ 【V-Max】Tactical Clock & Real-time Price: Global Timezone Navigator
Overview The V-Max Tactical Clock & Price is a high-visibility utility dashboard designed for traders operating in global markets. It provides real-time price tracking and synchronized local time display directly on the chart, ensuring precise execution timing regardless of the exchange's default timezone.
Technical Methodology & Logic This script employs a millisecond-level time compensation engine:
Physical Time Calibration: Unlike standard chart clocks, this script uses timenow + (tz_offset * 3,600,000) to perform precise millisecond compensation based on user-defined GMT offsets.
Dynamic Price Rendering: The price display utilizes conditional coloring logic (close >= open ? up_col : dn_col) to provide immediate visual feedback on current bar momentum.
High-Identifiability UI: Leverages the table.new titan rendering engine with size.huge font specs for the price, ensuring critical data remains readable even on small mobile screens or complex chart layouts.
Monospaced Formatting: Uses font.family_monospace to ensure numerical alignment and prevent visual flickering during rapid price fluctuations.
How to Use
Timezone Setup: Enter your local GMT offset (e.g., +8 for Taiwan/Singapore, -5 for New York) in the settings.
Visual Customization: Adjust the dashboard position and background transparency to fit your trading workspace.
產品概述 V-Max 戰術時鐘與價格顯示器是一款為全球市場交易者設計的高辨識度工具。它在圖表上直接提供實時價格追蹤與同步化的本地時間顯示,確保交易者無論在任何交易所時區下都能精確掌握執行時機。
技術邏輯與功能 本腳本採用毫秒級時間補償引擎:
物理時間校準:利用 timenow 配合自定義偏移量,實現精確的全球時區校準。
動能價格渲染:價格顯示具備即時漲跌變色邏輯,提供直觀的即時盤感反饋。
高辨識度 UI:採用 size.huge(特大)字體規格顯示價格,確保在手機端或複雜圖表下依然清晰易讀。
等寬字體格式:使用等寬字體確保數字在劇烈波動時不會跳動閃爍,維持視覺穩定性。
This tool is a free utility from the V-Max strategic suite.
Authorization: For other V-Max premium indicators (L1-L3), contact @VMax_Helper_bot.
Community: Join our group for real-time market tactical reports.

BK AK-Flag Formations🏴☠️ BK AK-Flag Formations — Raise the standard. Drive the line. Continue the assault. 🏴☠️
Built for traders who exploit momentum with discipline: flagpoles, flags, and pennants detected, tagged, and briefed—so you press advantage instead of hesitating.
🎖️ Full Credit (Engine + Logic — Trendoscope)
Original foundation (Trendoscope Flags & Pennants):
The entire detection engine—multi-zigzag swing extraction, pivot logic, pattern validation, classification framework, and drawing architecture—is Trendoscope. He’s the architect of the core system.
I’m not claiming the engine. I’m shipping a cleaner, more tactical interface layer on top of his work.
🧩 BK Enhancements (on top of Trendoscope)
Purpose: read continuation faster with less chart noise.
Short-form pattern tags so structure stays obvious without burying price:
BF / BeF / BP / BeP / F / P / UF / DF / RF / FF / AF / DeF
Label transparency controls (text + background), plus separate transparency control for short labels
Hover tooltips (toggle): hover the tag to reveal full pattern name + bias (Bullish / Bearish / Neutral)
Upgraded alert system: filters by Bias (Bullish/Bearish/Neutral) and Type (Flag / Pennant), with clearer alert messages
Pattern border extension (optional): extends the two pattern boundary lines forward by N bars so your levels stay mapped for break/retest planning
Everything else is Trendoscope’s architecture and math.
🧠 What It Does (The Mission)
This script hunts continuation formations that form after a strong impulse move:
Detects the flagpole (impulse)
Validates a consolidation structure (flag or pennant)
Tags it cleanly with short codes
Optional hover-briefing gives the long name + bias exactly when you need it
You get continuation structure in real time, across multiple swing sensitivities.
🧭 How It Detects (So You Know It’s Not Random)
This isn’t “pattern art.” It’s rule-based geometry + swing logic:
1) Multi-Zigzag Sweep (micro → macro)
Runs up to 4 zigzag engines so it catches both tight and larger continuations.
(Default BK tuning uses 4 levels with different swing lengths/depths.)
2) Quality Filters (you control strictness)
Key scanning controls:
Error Threshold: tolerance used during trendline validation
Flat Threshold: what qualifies as “flat” vs sloped
Max Retracement (default 0.618): limits how deep the consolidation can retrace the impulse
Verify Bar Ratio (optional): checks proportion/spacing of pivots, not just price
Avoid Overlap: prevents stacking formations on top of each other
Repaint option: allows refinement if better coordinates form (for real-time users)
3) Classification (Flag vs Pennant)
Once the engine confirms an impulse + valid consolidation, it classifies:
Flag = orderly channel/wedge-style consolidation after the pole
Pennant = tighter triangle-style compression after the pole
Then it labels with bias based on direction and formation context.
🏳️ Read the Continuation (Short Codes that Actually Matter)
BF — Bull Flag: strong pole → controlled pullback; watch for break + continuation expansion
BP — Bull Pennant: thrust → tight compression; expansion confirms carry
BeF — Bear Flag: down impulse → weak rallies; breakdown favors continuation lower
BeP — Bear Pennant: pause beneath resistance; release favors trend continuation
F / P: generic flag / pennant tags when the system can’t (or shouldn’t) over-specify
Standards aren’t decoration—they’re orders.
🧑🏫 Mentor A.K.
A.K. is the discipline behind this release.
No chasing. No gambling. No emotional entries.
He drilled one rule into everything: structure first, then execution—never the reverse.
This indicator exists to make that possible under pressure.
🤝 Give Forward (The Code of the Crew)
If this tool sharpens your edge:
Teach one trader how to read continuation properly (pole → base → trigger → invalidation)
Share process, not just screenshots (entry logic, stop logic, management plan)
If you build on open work: credit loudly and contribute improvements back when you can
Tools multiply force. Character decides the outcome.
👑 Respect to King Solomon (Wisdom > Impulse)
“Plans are established by counsel; by wise guidance wage war.” — Proverbs 20:18
Continuation trading is the same: impulse → formation → execution.
BK AK-Flag Formations — when the standard rises, the line advances.
Gd bless. 🙏

TZ - India VIX Volatility ZonesTZ – India VIX Volatility Zones is a long-term volatility analysis indicator designed to visually map important India VIX regimes using clearly defined horizontal zones and labels.
The indicator highlights how market volatility cycles between complacency, normal conditions, elevated risk, and panic phases. These zones are based on historical behavior of India VIX and help traders understand when risk is underpriced or overstretched.
This tool is especially useful for:
Index traders
Options sellers and buyers
Risk management and regime filtering
Long-term volatility study
How It Works
The script plots static, historically significant volatility zones on the India VIX chart and visually separates them using shaded bands and labels.
Volatility Zones Explained
1.Extreme Low Volatility (VIX 8–10)
Indicates market complacency and underpriced risk. Often precedes volatility expansion.
2.Low Volatility (VIX 10–13)
Stable market conditions with controlled movement.
3.Normal Volatility (VIX 13–18)
Healthy market behavior and balanced risk.
4.High Volatility (VIX 18–25)
Rising uncertainty and increased intraday swings.
5.Panic Zone (VIX 25–35+)
High fear environment, usually during major events or crises.
How Traders Can Use This Indicator
Identify volatility regimes before choosing option strategies
Avoid aggressive short-volatility trades during extreme zones
Prepare for volatility expansion during low-VIX phases
Use as a market risk context tool alongside price action
This indicator does not provide buy/sell signals. It is designed for contextual analysis and decision support.
Best Usage
Apply on India VIX (NSE:INDIAVIX)
Works best on Weekly and Monthly timeframes
Can be combined with index charts for volatility-based risk assessment
Disclaimer
This indicator is for educational and analytical purposes only.
It does not constitute financial advice or trade recommendations.
Users should apply proper risk management and confirm signals using additional analysis.

Relative Volume Context [Alturoi]Relative Volume Context is an advanced volume analysis indicator designed to help traders understand whether current volume is truly unusual—or simply normal for that moment in time.
Unlike traditional volume or basic relative volume tools, this indicator models expected volume based on historical time-based behavior (minutes, hours, days, sessions) and compares it directly to what is happening now.
The result is clear, structured insight into:
Unusual participation
Abnormal activity
Quiet vs active market conditions
When volume confirms price —and when it doesn’t
This tool is built for day traders and swing traders who want volume context , not just volume bars.
📌 What Problem This Indicator Solves
Raw volume is deceptive.
High volume at the open, low volume at lunch, and rising volume into the close are normal market behaviors —yet most indicators treat them as equal.
Relative Volume Context fixes this by asking a better question:
“Is today’s volume high or low compared to what normally happens at this exact time?”
By conditioning volume expectations on time and session structure , the indicator filters out noise and highlights moments where participation genuinely deviates from the norm.
🧩 How Relative Volume Context Works (Conceptually)
At its core, the indicator compares:
Actual Volume
Expected Volume for this time bucket
A time bucket can include combinations such as:
Minute of the hour
Hour of the trading day
Day of the week or month
Broader calendar structure (months / quarters)
Expected volume is calculated using historical data for that same bucket , creating a fair, apples-to-apples comparison.
This produces several meaningful outputs:
Expected Volume: the typical volume level for the current time context.
Difference: actual minus expected.
Surprise (%): a normalized measure of how large the deviation is relative to expectation.
Z-Score (Mean mode): a statistical measure of how extreme current volume is compared to its historical distribution.
Sample Size & Confidence: transparency into how much historical data supports the expectation.
🧠 Built for Clarity and Performance
Efficient data handling for intraday charts
Adaptive period selection (Auto Selection)
Optional forecast of expected future volume
Clean HUD showing context, confidence, and interpretation
🛠 How to Use It (Best Practices)
Use it with price , not instead of price.
Treat high readings as context , not automatic signals.
Combine with structure, levels, and market conditions.
Pay attention to Confidence / N before trusting extreme readings.
Avoid over-interpreting early history with low sample sizes.
👥 Who This Indicator Is For
Day traders trading U.S. equities
Swing traders monitoring participation and follow-through
Traders who value context over hype
Users who want transparency, not black-box signals
Subscribe to Alturoi ’s private, invite-only indicators designed to support informed trading decisions.
Volume is most powerful when it explains why price is moving—not when it’s used in isolation.
📊 Understanding the HUD: What Each Metric Actually Means
The HUD is designed to answer one core question:
“Is this volume unusual in a way I should care about?”
Raw volume on its own is misleading. Each field in the HUD exists to remove a specific form of self‑deception and replace it with context you can reason about.
🧭 Bucket — Unusual compared to when?
Volume has a strong time structure. A spike at 9:31 AM means nothing unless it’s compared to other 9:31 AM bars — not lunch hours, not overnight, not Fridays.
The bucket defines the comparison group:
Same minute of the hour
Same hour of the day
Same day of the week, month, or quarter
Without this, expected volume becomes a global average — statistically wrong and operationally misleading.
⚙️ Method (Mean vs Percentile) — What kind of “normal” am I using?
Different methods answer different trading questions:
Mean: fast, stable, symmetric, and enables Z‑scores. Best when volume distributions are smooth.
Percentile: robust to outliers and news spikes. Answers how rare this volume is historically.
Mean measures deviation from equilibrium. Percentile measures rarity. If you don’t know the method, you can’t interpret the signal correctly.
🔢 N (Sample Size) — Is this statistic even trustworthy?
Statistics without sample size are vibes.
N = 12 → noise dressed as math
N = 200 → structure
Two identical surprise readings with different N values are not the same signal. This single number prevents false confidence.
📐 Confidence — How much weight should I give this?
Confidence is a human‑readable compression of N:
Low → exploratory only
Medium → usable with context
High → structurally reliable
This isn’t judgment — it’s statistical humility.
📊 Expected — Expected relative to what baseline?
Expected volume is the anchor of everything else.
Without seeing it:
You can’t tell whether surprise comes from a low or high base
You can’t sanity‑check the model
If Expected looks wrong, the signal is wrong — full stop.
⭐ Surprise (%) — How large is the deviation in practical terms?
Raw differences don’t scale. Surprise % normalizes across symbols, timeframes, and regimes.
A +80% surprise on SPY at 10:15 matters. A +5% surprise usually doesn’t. This is the actionability metric.
📐 Z‑Score — Is this statistically extreme or just mildly off?
Z‑score adds distribution context:
0.5σ → normal fluctuation
2σ → uncommon
3σ → rare, regime‑relevant
Two bars can share the same % surprise but have very different Z‑scores if volatility differs. Z tells you whether the market itself considers this bar “weird.”
The deeper point
Most volume indicators stop at: “Volume is high.”
Relative Volume Context forces the harder, more honest question:
“High compared to what, how rare, and how reliable is that comparison?”
That’s the difference between decorative indicators and decision‑support instruments .
🔍 Why This Matters for Day & Swing Traders
Relative Volume Context is not a signal generator . It is a decision-support tool .
Practical uses include:
Identifying unusual participation during breakouts or breakdowns
Distinguishing real interest from routine session volume
Avoiding false confidence in moves occurring on “normal” volume
Spotting regime shifts or news reactions (participation shocks)
Understanding when low volume truly signals lack of interest
Used correctly, it helps traders answer:
“Is this move being supported by abnormal activity, or is it just time-of-day noise?”
Disclaimer: This indicator is provided for educational and informational purposes only and does not constitute financial or investment advice. Trading involves risk, and past market behavior does not guarantee future results. Always use proper risk management and independent judgment.

QuantLabs MASM Correlation TableThe Market is a graph. See the flows:
The QuantLabs MASM is not a standard correlation table. It is an Alpha-Grade Scanner architected to reveal the hidden "hydraulic" relationships between global macro assets in real-time.
Rebuilt from the ground up for Version 3, this engine pushes the absolute limits of the Pine Script™ runtime. It utilizes a proprietary Logarithmic Math Engine, Symmetric Compute Optimization, and a futuristic "Ghost Mode" interface to deliver a 15x15 real-time correlation matrix with zero lag.
Under the Hood: The Quant Architecture
We stripped away standard libraries to build a lean, high-performance engine designed for institutional-grade accuracy.
1. Alpha Math Engine (Logarithmic Returns) Most tools calculate correlation based on Price, which generates spurious signals (e.g., "Everything is correlated in a bull run").
The Solution: Our engine computes Logarithmic Returns (log(close/close )) by default. This measures the correlation of change (Velocity & Vector), not price levels.
The Result: A mathematically rigorous view of statistical relationships that filters out the noise of general market drift.
Dual-Core: Toggle seamlessly between "Alpha Mode" (Log Returns) for verified stats and "Visual Mode" (Price) for trend alignment.
Calculation Modes: Pearson (Standard), Euclidean (Distance), Cosine (Vector), Manhattan (Grid).
2. Symmetric Compute Optimization Calculating a 15x15 matrix requires evaluating 225 unique relationships per bar, which often crashes memory limits.
The Fix: The V3 Engine utilizes Symmetric Logic, recognizing that Correlation(A, B) == Correlation(B, A).
The Gain: By computing only the lower triangle of the matrix and mirroring pointers to the upper triangle, we reduced computational load by 50%, ensuring a lightning-fast data feed even on lower timeframes.
3. Context-Aware "Ghost Mode" The UI is designed for professional traders who need focus, not clutter.
Smart Detection: The matrix automatically detects your current chart's Ticker ID. If you are trading QQQ, the matrix will visually highlight the Nas100 row and column, making them opaque and bright while dimming the rest.
Dynamic Transparency: Irrelevant data ("Noise" < 0.3 correlation) fades into the background. Only significant "Alpha Signals" (> 0.7) glow with full Neon Saturation.
Key Features
Dominant Flow Scanner: The matrix scans all 105 unique pairs every tick and prints the #1 Strongest Correlation at the bottom of the pane (e.g., DOMINANT FLOW: Bitcoin ↔ Nas100 ).
Streak Counter: A "Stubbornness" metric that tracks how many consecutive days a strong correlation has persisted. Instantly identify if a move is a "flash event" or a "structural trend."
Neon Palette: Proprietary color mapping using Electric Blue (+1.0) for lockstep correlation and Deep Red (-1.0) for inverse hedging.
Usage Guide
Placement: Best viewed in a bottom pane (Footer).
Assets: Pre-loaded with the Essential 15 Macro Drivers (Indices, BTC, Gold, Oil, Rates, FX, Key Sectors). Fully editable via settings (Ticker|Name).
Reading the Grid:
🔵 Bright Blue: Assets moving in lockstep (Risk-On).
🔴 Bright Red: Assets moving perfectly opposite (Hedge/Risk-Off).
⚫ Faded/Black: No statistical relationship (Decoupled).
Key Improvements Made:
Formatting: Added clear bullet points and bolding to make it scannable.
Clarity: Clarified the "Logarithmic Returns" section to explain why it matters (Velocity vs. Price Levels).
Tone: Maintained the "high-tech/quant" vibe but removed slightly clunky phrases like "spurious signals" (unless you prefer that academic tone, in which case I left it in as it fits the persona).
Structure: Grouped the "Modes" under the Math Engine for better logic.
Created and designed by QuantLabs

52-Week Range Dashboardthis shows the diff in % between the 52 week high and low
this is called coiling method, you may observe whenever the diff in % between 52 week high and low price is 30% or below, that's the time the script will show a move.
Thank you
have a great day

Anurag - Balanced 0DTE Scalper QQQ SPYBalanced 0DTE Scalper is a professional-grade execution system designed specifically for the high-velocity world of 0DTE (Zero Days to Expiration) options trading on indices like SPY, QQQ, and IWM.
Unlike standard indicators that repaint or lag, this system uses Non-Repainting Multi-Timeframe Logic to align the institutional trend (15m) with precision entry triggers (5m). It is engineered to solve the two biggest killers of 0DTE traders: Theta Decay (holding too long) and Choppy Markets (trading without trend).
How It Works
1. The "Safety Belt" (15-Minute Trend Filter) Before any trade is taken, the system checks the confirmed 15-minute Trend and ADX (Strength).
No Repainting: It strictly uses the previous closed 15m bar to determine bias. Once a signal prints, it stays printed.
Regime Detection: It automatically blocks trades during low-volume "chop" (Low ADX) to save you from theta burn.
2. Precision Entry Triggers (5-Minute) Once the 15m trend gives the "Green Light," the system hunts for 5m setups using a confluence of:
EMA Crossovers: For immediate momentum.
VWAP Filter: Ensuring you are on the right side of institutional volume.
RSI Check: To avoid buying tops or selling bottoms.
3. Aggressive Risk Management (The "Profit Locker") 0DTE profits can vanish in seconds. This script manages the trade for you visually:
Dynamic Trailing Stop: Trails price based on candle Highs/Lows (not closes), allowing it to lock in profits at the peak of a spike.
Time Stop: If a trade stalls for 60 minutes (12 bars), the system triggers a "Time Exit." In 0DTE, time is money—if it's not working, get out.
Visual Levels: Automatically draws your Stop Loss, Target 1 (Conservative), and Target 2 (Runner) lines on the chart.
Features & Dashboard
Live Dashboard: Monitors Trend Bias, ADX Strength, RSI, and Open PnL in real-time.
On-Chart Tickets: Prints a "CALL OPEN" or "PUT OPEN" label with the exact Entry Price, Stop Loss, and Strike Suggestion.
Session Filters: Automatically avoids the first 10 minutes (Open Volatility) and the last 15 minutes (Close Chaos).
Settings Guide
Risk Mode:
Balanced (Default): The recommended blend of Trend + Momentum.
Conservative: Requires a very strong ADX trend. Fewer trades, higher win rate.
Aggressive: Ignores ADX strength. Good for FOMC/CPI days only.
Strike Suggestion: Automatically calculates the nearest Strike Price (ATM/OTM) for SPY/QQQ based on your settings.
Disclaimer
This tool is for educational purposes only. 0DTE options trading involves extreme risk of capital loss. Past performance (even with non-repainting logic) is not indicative of future results. Always manage your risk.

Market Risk Regime Dashboard (SPX/VIX)Market Risk Regime Dashboard (SPX–VIX)
Market Risk Regime Dashboard (SPX–VIX) is a context and confirmation tool designed to classify market conditions as Risk-On, Risk-Off, or Neutral by analyzing the real-time relationship between the S&P 500 Index (SPX) and the CBOE Volatility Index (VIX).
Rather than predicting price direction, this script focuses on identifying market environment and participation conditions that often influence trade quality, position sizing, and strategy selection.
Core Concept: SPX vs VIX Risk Regimes
The indicator operates on a well-documented market relationship:
SPX reflects equity risk appetite and directional participation
VIX reflects implied volatility and risk aversion
The script classifies conditions as:
Risk-On → SPX bullish and VIX falling
Risk-Off → SPX bearish and VIX rising
Neutral → Any mixed or non-aligned condition
This alignment is visualized using:
Background color on the chart
A compact dashboard table
Optional alerts
Trend Strength via Normalized EMA Distance (n-Value)
To quantify trend strength, the script computes a normalized trend metric (“n-value”) for SPX:
A fast EMA and slow EMA are calculated on SPX
The absolute distance between the EMAs is measured
That distance is normalized by an ATR-based volatility measure
The result is a dimensionless value that expresses trend strength relative to volatility, allowing comparisons across timeframes.
Higher n-values indicate stronger directional conditions, while lower values suggest compression or range behavior.
Dashboard Display
A movable on-chart table summarizes:
SPX directional bias (Bullish / Bearish / Neutral)
VIX behavior (Rising / Falling)
SPX n-value trend strength
This allows traders to quickly assess market context without switching symbols or charts.
Strong Candle Detection (SPX)
The script identifies strong directional candles on SPX using objective criteria:
Candle body must represent a minimum percentage of total range
Close must occur near the extreme (high for bullish, low for bearish)
Direction must align with candle body
When detected:
A triangle marker is plotted
The chart bar is optionally colored
Additional alerts can trigger when strong candles align with Risk-On or Risk-Off regimes
These signals are intended to highlight initiative participation, not standalone entries.
Visual & Alert Features
Background color reflects current risk regime:
Green = Risk-On
Red = Risk-Off
Gray = Neutral
Alerts available for:
Risk-On alignment
Risk-Off alignment
Neutral conditions
Strong candles aligned with risk regime
Elevated normalized trend strength (n-value range)
Alerts can be used for situational awareness rather than execution triggers.
How Traders Typically Use This Script
Filter trades based on broader market risk context
Adjust aggressiveness or size during Risk-On vs Risk-Off regimes
Confirm directional conviction when price action aligns with volatility behavior
Avoid forcing trades during neutral or conflicting environments
This script is not a trading system and does not provide entries or exits. It is a contextual decision-support tool designed to improve alignment between price action and market risk conditions.

RS Rating Multi-Timeframe v2RS Rating Multi-Timeframe
A relative strength rating indicator modeled after IBD's proprietary RS Rating system. This indicator measures a stock's price performance relative to the S&P 500 (or any benchmark you choose) and converts it to a 1-99 rating scale.
How It Works
The indicator calculates weighted performance ratios across four timeframes:
40% weight: 63-day (3-month) performance
20% weight: 126-day (6-month) performance
20% weight: 189-day (9-month) performance
20% weight: 252-day (12-month) performance
This weighting emphasizes recent performance while still accounting for longer-term strength—the same methodology used by leading growth stock research services.
Rating Scale
90-99: Elite relative strength (top 10% of stocks)
80-89: Strong relative strength (top 20%)
50-79: Average performance
30-49: Below average
1-29: Weak relative strength (bottom 30%)
Features
Customizable benchmark index (default: S&P 500)
Optional moving average overlay (EMA or SMA)
Visual zones with color-coded backgrounds
Signal markers when RS crosses key thresholds (80 and 30)
Info table showing current rating, daily change, MA value, and raw score
Built-in alerts for threshold crossovers
Pine Screener Compatible
This indicator includes state-based plots specifically designed for TradingView's Pine Screener. You can screen watchlists for:
RS Above 90, 80, 70, or 50
RS Below 50 or 30
RS Above/Below its moving average
Custom thresholds using the raw RS Rating value
In the Pine Screener, select the "Screener RS Above 80" output and set it to "True" (or equals 1) to find all stocks currently above 80—not just those crossing on that bar.
Usage Tips
Growth investors typically look for stocks with RS Ratings above 80, indicating the stock is outperforming 80% of the market. Combining high RS Rating with other technical signals (breakouts, volume, moving averages) can help identify leading stocks.

Pivot Edge ProOverview
Smart Pivot Analytics is a highly accurate technical analysis tool designed to identify and validate significant price levels. Unlike standard pivot indicators that only mark recent highs, this tool backtests each identified pivot against thousands of historical candlesticks to calculate its real-world “success rate.”
Key Features
Historical Backtesting: The indicator scans up to 4,900 historical columns to find every instance where price interacted with a specific pivot level.
Strength Score (%): Each level is assigned a percentage score based on its reversal rate. It calculates how many times the price has successfully reached and rejected the level, providing a statistical “hit rate.”
Dynamic Hit Counter: Displays the exact number of times a level has been tested (hit), helping traders distinguish between new levels and established “old” levels.
Smart Filtering: To keep the chart clean, the indicator automatically filters out weak levels and prevents “clutter” by merging levels that are too close together.
Infinite Left Projection: Lines extend left to infinity, allowing traders to see the historical significance of a level across the entire price history at a glance.
How to Trade with It
Red Levels (High Power > 75%): These are “Top Reaction Zones”. Expect a strong price rejection or significant breakout when these levels are tested.
Orange Levels (Medium Power): Suitable for profit targets or as secondary confirmation for entering a trade.
Encounter: Use these levels in conjunction with your existing strategy. When a high power pivot aligns with your entry signal, the probability of a successful trade increases significantly.
Technical Parameters
Lookback Period: Defines how far back in history the script calculates power.
Touch Radius: The "sensitivity" of the level (how close the price has to get to be considered a "hit").
Minimum Strength: A filter to show only the most reliable levels.

Watchlist Auto Buy/Sell AlertsTrial for the best. This indicator is built to assess the chart and make it easier for traders to identify coins that are available for trading and minimize losses.

Jack Dunn (Mean Reversion, Z-score + Vol Filter + Trend Filter))based on mean reversion and z score
FOR 1M XAUUSD or 5M USDJPY

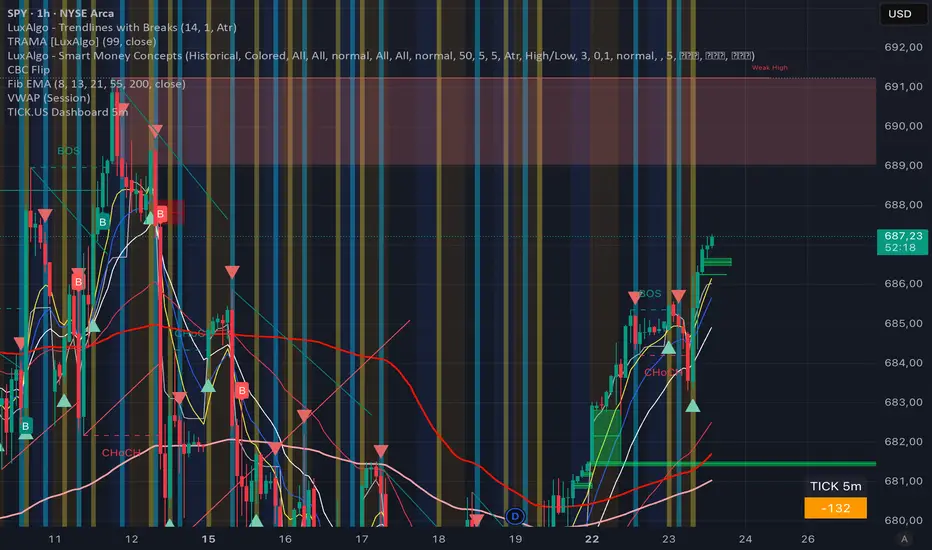
TICK.US Dashboard 5mIt's a very simple script, It displays the TICK.US Timeframe 5 mn on your template
#BLTA - CARE 7891🔷 #BLTA - CARE 7891 is an overlay toolkit designed to support structured trading preparation and chart reading. It combines a manual Trade Box + Lot Size/Risk panel, session background highlights (NY time), confirmed Previous Day/Week High-Low levels, an Asian range liquidity box, a 1H ZigZag market-structure projection, and an imbalance map (FVG / OG / VI) with an optional dashboard.
This script is an indicator (not a strategy). It does not place orders and is intended for planning, risk visualization, and market context.
✅ Main Modules
1) 💸 Risk Module (Trade Box + Lot Calculation + Table)
A complete manual trade-planning tool:
Pick an Entry Point (EP) and Stop Loss (SL) directly on the chart using input.price(..., confirm=true).
Automatically calculates:
Cash at Risk
SL distance (pips) (Forex-aware)
Lot size based on your:
Account balance
Risk %
Units per lot
Account base currency (with conversion if needed)
Draws:
Risk box (EP ↔ SL)
Target box (RR-based TP)
Displays a clean table panel with the key values.
🔁 Re-confirm Mode (Wizard)
Use “Re-confirm Trade Box Points” to force a clean logical reset and re-pick EP/SL/time anchors:
Shows temporary EP/SL labels
Shows a small wizard table guiding you step-by-step
Turn it OFF to return to normal risk table + boxes
Tip: If your chart timeframe changes or you want a fresh selection, Re-confirm mode is the safest way to reset everything cleanly.
2) 🎨 Session Visualization (New York Time)
Highlights chart background for these windows:
Day Division (17:00–17:01 NY)
London (03:00–05:00 NY) + sub-windows
New York (08:00–10:30 NY) + sub-windows
Colors are fully configurable from inputs.
3) 📰 Confirmed PDH/PDL (Previous Days)
Optional module that plots confirmed Previous Day High (PDH) and Previous Day Low (PDL):
Trading day is defined as 17:00 → 17:00 NY
Lines start exactly at the candle where the high/low occurred
Lines extend forward and can freeze when price touches them
Configurable: days to keep, style, width, and “stop on hit”
4) 📅 Confirmed Weekly High/Low (Previous Weeks)
Optional module that plots confirmed Weekly High/Low:
Confirmation occurs at Sunday 17:00 NY (typical FX week boundary)
Lines begin at the candle where the weekly extremes formed
Extends forward and can freeze on touch
Configurable: weeks to keep, style, width, stop-on-hit
5) 🈵 Asian Range Liquidity Box
Draws a session box that tracks high/low and optional midline (50%):
Uses New York time
Dynamic updates while session is active
Optional mid label and configurable line style/width
6) 📈 Market Structure - ZigZag (1H projected)
A ZigZag structure engine calculated on 1H and projected onto any timeframe:
Configurable:
Length
Source type (High/Low or Open/Close)
Colors and width
Opacity when viewing non-1H charts
Optional live extension of the last leg
Includes safe cleanup when toggling OFF (no leftover objects)
7) 📊 Imbalance Detector (FVG / OG / VI) + Dashboard
Detects and draws:
Fair Value Gaps (FVG)
Opening Gaps (OG)
Volume Imbalances (VI)
Optional dashboard shows frequencies and fill rates.
Attribution / Credits
This module is inspired by / adapted from the public concept widely known as “Imbalance Detector” (LuxAlgo-style logic). This script is independently packaged and integrated as part of the toolkit with additional modules and custom structure.
⚙️ How to Use (Quick Steps)
Add the indicator to the chart (overlay).
Enable 💸 Risk Module if you want trade planning.
Go to Trade Box Location and pick:
Entry Point (EP)
Stop Loss (SL)
Time anchors for box edges
Adjust:
Account balance, risk %, units per lot, RR target
Enable additional modules as needed:
Session backgrounds
PDH/PDL
Weekly High/Low
Asian range box
ZigZag
Imbalances + dashboard
🔎 Notes & Limitations
This script is for visual planning and context, not trade execution.
Lot sizing is based on the selected EP/SL and your inputs; always double-check broker rules, symbol specifications, and contract size.
Object-heavy features (boxes/lines/tables) may increase load on lower-end devices or very small timeframes.

Supertrend 14-3 with Auto Fibthis strategy use the supertrend with the Auto fib levels for market analysis

Drawdown % + STD Bands: Log-Scale Macro ToolDrawdown % + STD Bands: Log-Scale Macro ToolDescription: The exact indicator big-macro accounts use: tracks real-time drawdown from the rolling 252-period peak, then plots -1σ (blue) and -2σ (orange) bands on a clean percent scale. Built for weekly charts-shows if a stock, index, or crypto is statistically cheap (hit -1σ) or generational-buy territory (-2σ). Works flawlessly on SPX, Nasdaq, Bitcoin, Gold, Tesla... anything. How to Use (read it aloud like a voice memo): 1. Slap this under any chart, set to weekly timeframe . 2. Flip the price pane to log scale -zero negotiations. 3. Watch the thick red line: • Hovering 0 %? Bullish noise, chill. • Kissing blue (-10 % to -25 %)? Start loading-happens every 1-2 years. • Touching orange (-30 %+)? Panic sale finished. Buy like rent money's burning a hole. 4. Zoom out five-ten years; monthly works too if you want lazy vibes. Daily? Trash-too twitchy. Pro tip: Name your watchlist Panic Plays, drop this in, and ping me when MELI or GOOGL hits orange. I'll confirm if it's actually stupid-cheap.

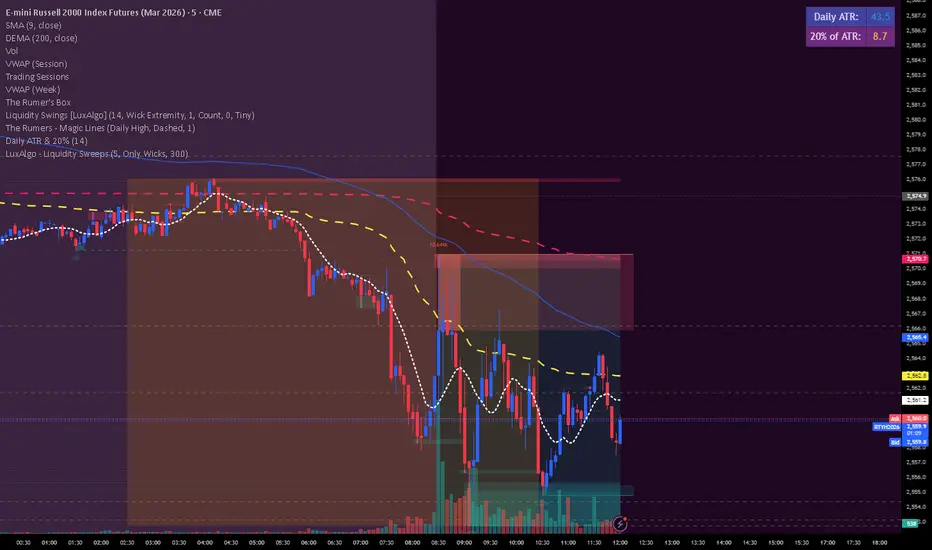
Daily ATR & 20%This is the daily atr value that is put in a table in upper right corner of trading view. it calculated 20% of the daily atr for a quick reference to see if the first candle is a manipulation candle.
SZS Slow StochasticThis indicator is designed to:
Identify momentum extremes using Slow Stochastic
Highlight duration of overbought/oversold conditions
Signal potential reversals when exiting extremes
Confirm conditions using RSI momentum coloring
Provide clear, low-noise visual cues without clutter
It is especially useful for:
Mean-reversion strategies
Timing entries after momentum exhaustion
Visual backtesting of stochastic behavior over time


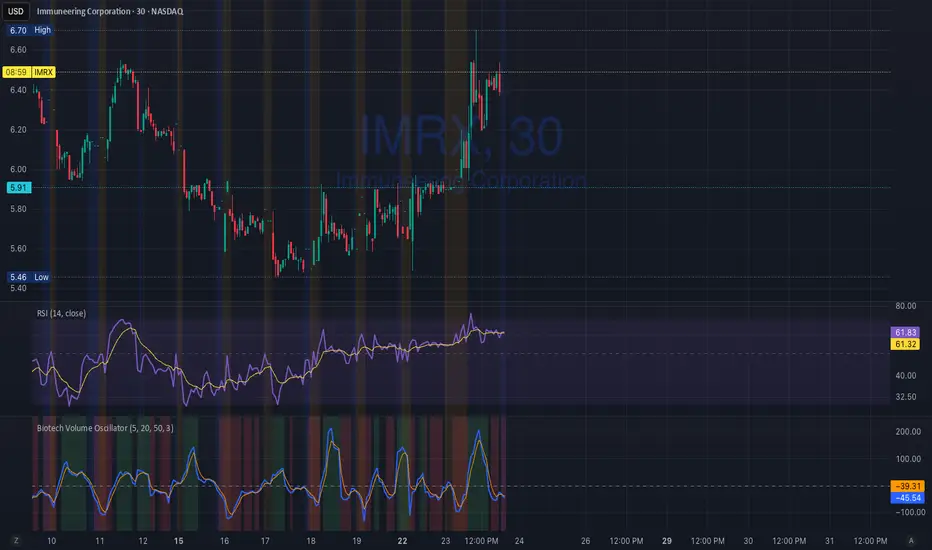
Biotech Volume Oscillator1️⃣ What This Indicator Is (In One Sentence)
It tells you whether people are actually showing up to trade the stock, or if price is just drifting around on low interest.
That’s it.
It does not predict price.
It tells you whether a move is real or fragile.
2️⃣ What the Lines Mean
You see two lines:
🔵 Blue Line = Live Participation
Fast
Reacts immediately
Shows what traders are doing right now
Think:
“Is anyone actually trading this candle?”
🟠 Orange Line = Accepted Participation
Slower
Smoothed
Shows what the market has decided is normal
Think:
“Is this level of activity sticking?”
3️⃣ What the Numbers Mean (Very Important)
The numbers are percentages vs normal volume for this stock.
Around 0
Volume is normal
Nothing special happening
+10 to +25
Healthy interest
Traders are paying attention
Moves can continue
Above +25
Abnormal participation
News, hype, or institutions involved
Moves here tend to be fast
Below –20
Participation drying up
Drift, chop, fake breakouts
Below –30
Nobody is home
Price can move, but it’s fragile
Breakouts usually fail
4️⃣ How to Use It (Step-by-Step)
Step 1: Ignore Price for a Second
Look only at the oscillator.
Ask:
“Is this above zero or below zero?”
Step 2: Look at Direction
Rising oscillator → interest increasing
Falling oscillator → interest fading
Step 3: Compare Blue vs Orange
✅ Good / Healthy
Blue above orange
Both rising
→ New participation is entering
⚠️ Warning
Price rising
Blue flat or falling
Orange flat
→ Float, not conviction
🚨 Distribution
Blue rolls over from high levels
Orange follows
Price still looks “fine”
→ Selling into strength
Option Price SR (csgnanam)## ⚖️ Disclaimer
This script is provided for **educational and analytical purposes only**.
It does not constitute financial advice.
Use proper risk management and trade responsibly.
---
## 📌 Indicator Concept & Trading Logic
This is a rule-based reference indicator designed to interpret **option price behavior** using **previous-day derived equilibrium levels**.
The indicator helps traders classify the market into **range-bound, breakout, or invalid trade zones** by observing how **ATM Call (CE) and Put (PE)** prices react around these levels.
All levels are **fixed for the trading day** and recalculated only on the next session.
---
## 📊 Core Levels Explained
The indicator plots the following **daily-anchored reference levels**:
* **PDH / PDL** – Previous Day High / Low of the option
* **PDC** – Previous Day Close
* **100% AVG (Breakout Zone)**
Average of previous-day CE and PE prices for the same strike
* **75% AVG (Midzone)**
Balance / decision zone
* **50% AVG (Support Zone)**
Lower acceptance / decay boundary
These levels act as **reaction zones**, not prediction lines.
---
## 🧠 Market Interpretation Logic
### 1️⃣ Range-Bound Market Condition
* When **both ATM CE and ATM PE** are **trading within the 100% AVG (Breakout) level**,
the market has a **high probability of remaining range-bound**.
* Premium expansion is limited on both sides.
* Ideal environment for **non-directional strategies**.
---
### 2️⃣ Breakout Validation
* A **true directional move** requires **asymmetry** between CE and PE.
* If **one side moves into breakout**, the **opposite side must stay suppressed**.
**Example:**
* If **CE breaks down below Midzone**,
then **PE must be above Breakout or at least above Midzone**.
* The same logic applies inversely for PE breakdowns.
This confirms **capital rotation**, not random premium decay.
---
### 3️⃣ Midzone (75%) – Reversal Watch Area
* The **Midzone** is a **high-probability reaction area**.
* Many intraday reversals initiate from this level.
* Price acceptance or rejection here defines:
* Continuation
* Mean reversion
* Failed breakout
This zone should be **closely monitored for structure and volume behavior**.
---
### 4️⃣ Support Zone (50%) – Trade Invalidation
* When an option price trades **below the Support (50%) level**:
* That option side becomes **non-tradable**
* Premium strength is lost
* Risk increases significantly
Trades **below support** are considered **low probability** and should be avoided.
---
## ⚠️ Important Usage Notes
* This indicator is **not a buy/sell signal generator**
* It is a **context and decision-filter tool**
* Best used in combination with:
* Price action
* Structure
* Spot/index behavior
* Time-of-day context
All levels are **session-anchored** and do **not repaint intraday**.
---
## 🎯 Intended Use Case
* Intraday option traders
* ATM / near-ATM focus
* Range vs directional market identification
* Premium behavior analysis
* Trade filtering and risk control
---
