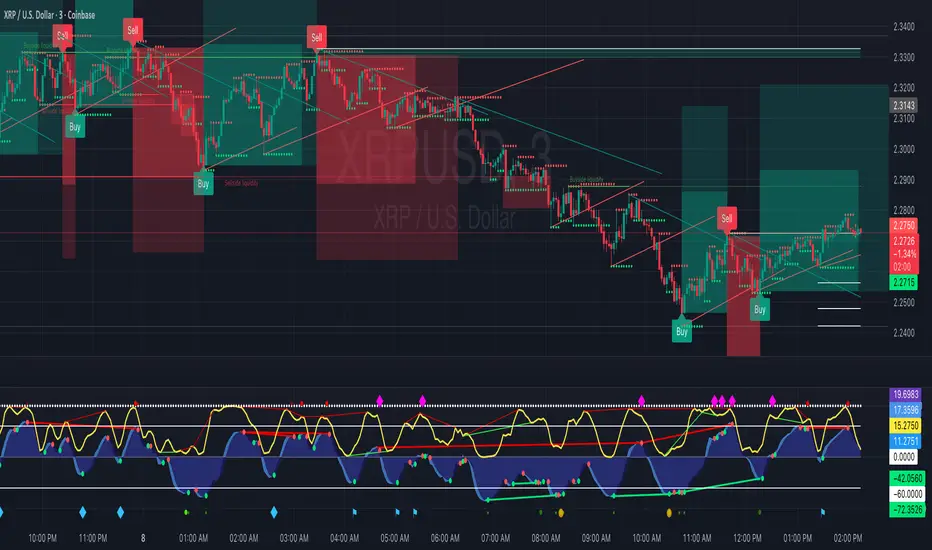
Order Blocks with Buy/Sell Signals (3M Capital)
Recommended Timeframes: 5-minute (M5) to 30-minute (M30) charts.
Why It Works Well: These capture short-term momentum shifts and frequent signals from minor swings. The zone projections (based on the 75th percentile of past deltas by default) can forecast quick price extensions, allowing for rapid entries on buy/sell labels (e.g., enter long on a "Buy" signal at a bullish pivot, targeting the zone's projected end). Use tight stops above/below the pivot and aim for 1:1 to 1:2 risk-reward. Backtesting on M30 has shown good accuracy for order block detection in pairs like EUR/USD.
Tips for This Indicator: If signals feel noisy, increase the swing length (e.g., to 30-50) to filter smaller swings, or enable "No Overlapping Zones" to avoid clutter. Avoid very low TFs like 1-minute if volatility is high, as percentile-based zones may overproject.
2. Medium-Term Trading (Day Trading or Short Swing Trades)Recommended Timeframes: 1-hour (H1) to 4-hour (H4) charts.
Why It Works Well: These strike a balance between reliability and frequency. Order blocks on H1/H4 tend to represent institutional interest (e.g., areas of limit order accumulation), making signals more predictive. The indicator's forward-projecting zones can anticipate moves over several hours to a day, ideal for holding trades through sessions. Examples from gold (XAU/USD) and forex pairs show strong performance here, with H4 often used to spot liquidity zones tied to order blocks.
3. Long-Term Trading (Swing or Position Trades)Recommended Timeframes: Daily (D1) or higher (e.g., weekly).
Why It Works Well: Higher TFs reduce false signals from noise, and the zones project significant moves (e.g., weeks to months). This aligns with the indicator's percentile approach, which draws from up to 1,000 past reversals for robust stats. Signals are rarer but higher-probability, suitable for trend-following.
Tips for This Indicator: Enable "Show Only Last Zone" for cleaner charts. Normalization (if enabled) helps with percentage-based assets like crypto.
General Strategy Tips Across TimeframesMulti-Timeframe Approach (Highly Recommended): Identify key order blocks on a higher timeframe (e.g., H4 or D1 for structure) and switch to a lower timeframe (e.g., M15 or H1) for precise entries on signals. This filters noise and aligns with smart money concepts—refine broad zones by checking for breaks of structure or fair value gaps on the lower TF. The indicator isn't inherently multi-timeframe (MTF), but it can be applied manually across charts or modified to incorporate MTF data if needed.
Asset Considerations: For volatile markets like crypto (e.g., BTC/USDT), favor M5-H1 to catch quick reversals. For forex/commodities, H1-H4 excels due to session-based liquidity.
Customization and Testing: Adjust the zone percentile (default 75) lower for tighter zones on short TFs or higher for expansive ones on long TFs. Always backtest on historical data for the specific asset—e.g., the indicator's signals have shown effectiveness on M15-M30 for intraday setups.
Risk Management: Trade in the direction of the overall trend; use the projected zone end as a take-profit target, and place stops beyond the pivot price.
This guidance is drawn from established order block trading practices, where higher TFs provide consistency while lower ones offer timing.
Skrypt tylko na zaproszenie
Dostęp do tego skryptu mają wyłącznie użytkownicy zatwierdzeni przez autora. Aby z niego korzystać, należy poprosić o zgodę i ją uzyskać. Zgoda jest zazwyczaj udzielana po dokonaniu płatności. Więcej informacji można znaleźć w instrukcjach autora poniżej lub kontaktując się bezpośrednio z CapitalHoldings3M.
TradingView NIE zaleca płacenia za skrypt ani korzystania z niego, jeśli nie ma pełnego zaufania do jego autora i nie rozumie się zasad jego działania. Można również znaleźć darmowe, otwartoźródłowe alternatywy w skryptach społeczności.
Instrukcje autora
Wyłączenie odpowiedzialności
Skrypt tylko na zaproszenie
Dostęp do tego skryptu mają wyłącznie użytkownicy zatwierdzeni przez autora. Aby z niego korzystać, należy poprosić o zgodę i ją uzyskać. Zgoda jest zazwyczaj udzielana po dokonaniu płatności. Więcej informacji można znaleźć w instrukcjach autora poniżej lub kontaktując się bezpośrednio z CapitalHoldings3M.
TradingView NIE zaleca płacenia za skrypt ani korzystania z niego, jeśli nie ma pełnego zaufania do jego autora i nie rozumie się zasad jego działania. Można również znaleźć darmowe, otwartoźródłowe alternatywy w skryptach społeczności.