First indicator
The Pine Editor
The Pine Editor is where you will be working on your scripts. While you can use any text editor you want to write your Pine scripts, using the Pine Editor has many advantages:
- It highlights your code following Pine Script® syntax.
- It pops up syntax reminders when you hover over language constructs.
- It provides quick access to the Pine Script Reference Manual popup when you select
CtrlorCmdand a built-in Pine Script construct, and opens the library publication page when doing the same with code imported from libraries. - It provides an auto-complete feature that you can activate by selecting
Ctrl+SpaceorCmd+I, depending on your operating system. - It makes the write/compile/run cycle more efficient because saving a new version of a script already loaded on the chart automatically compiles and executes it.
To open the Pine Editor, select the “Pine Editor” tab at the bottom of the TradingView chart.
First version
Let’s create our first working Pine script, an implementation of the MACD indicator:
- Open the Pine Editor’s dropdown menu (the arrow at the top-left corner of the Pine Editor pane, beside the script name) and select “Create new/Indicator”.
- Copy the example script code below by clicking the button on the top-right of the code widget.
- Select all the code already in the editor and replace it with the example code.
- Save the script by selecting the script name or using the keyboard shortcut
Ctrl+S. Choose a name for the script (e.g., “MACD #1”). The script is saved in TradingView’s cloud servers, and is local to your account, meaning only you can see and use this version. - Select “Add to chart” in the Pine Editor’s menu bar. The MACD indicator appears in a separate pane under the chart.
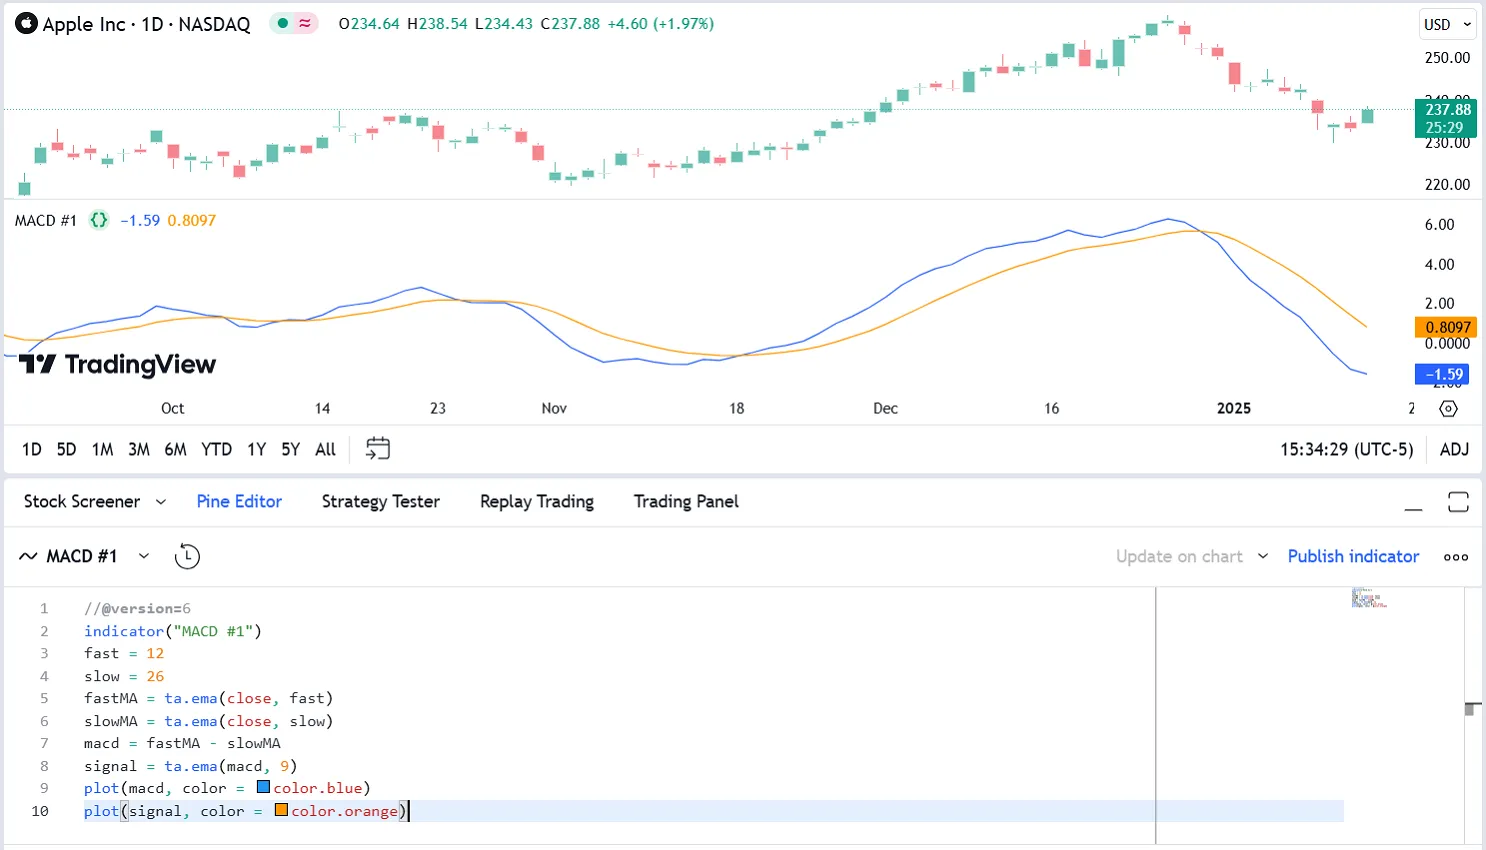
Our first Pine script is now running on the chart, which should look like this:

Let’s look at our script’s code, line by line:
Line 1: //@version=6
Line 2: indicator("MACD #1")
Line 3: fast = 12
fast as the length of the fast moving average.
Line 4: slow = 26
slow as the length of the slow moving average.
Line 5: fastMA = ta.ema(close, fast)
fastMA, which holds the result of the EMA (Exponential Moving Average) calculated on the close series, i.e., the closing price of bars, with a length equal to fast (12).
Line 6: slowMA = ta.ema(close, slow)
slowMA, which holds the result of the EMA calculated on the close series with a length equal to slow (26).
Line 7: macd = fastMA - slowMA
macd as the difference between the two EMAs.
Line 8: signal = ta.ema(macd, 9)
signal as a smoothed value of macd using the EMA algorithm with a length of 9.
Line 9: plot(macd, color = color.blue)
macd using a blue line.
Line 10: plot(signal, color = color.orange)
signal using an orange line.
Second version
The first version of our script calculated the MACD using multiple steps, but because Pine Script is specially designed to write indicators and strategies, built-in functions exist for many common indicators, including one for MACD: ta.macd().
Therefore, we can write a second version of our script that takes advantage of Pine’s available built-in functions:
Note that:
- We add inputs so we can change the lengths of the moving averages from the script’s settings.
- We now use the ta.macd() built-in function to calculate our MACD directly, which replaces three lines of calculations and makes our code easier to read.
Let’s repeat the same process as before to create our new indicator:
- Open the Pine Editor’s dropdown menu (the arrow at the top-left corner of the Pine Editor pane, beside the script name) and select “Create new/Indicator”.
- Copy the example script code above. The button on the top-right of the code widget allows you to copy it with a single click.
- Select all the code already in the editor and replace it with the example code.
- Save the script by selecting the script name or using the keyboard shortcut
Ctrl+S. Choose a name for your script that is different from the previous one (e.g., “MACD #2”). - Select “Add to chart” in the Pine Editor’s menu bar. The “MACD #2” indicator appears in a separate pane under the “MACD #1” indicator.
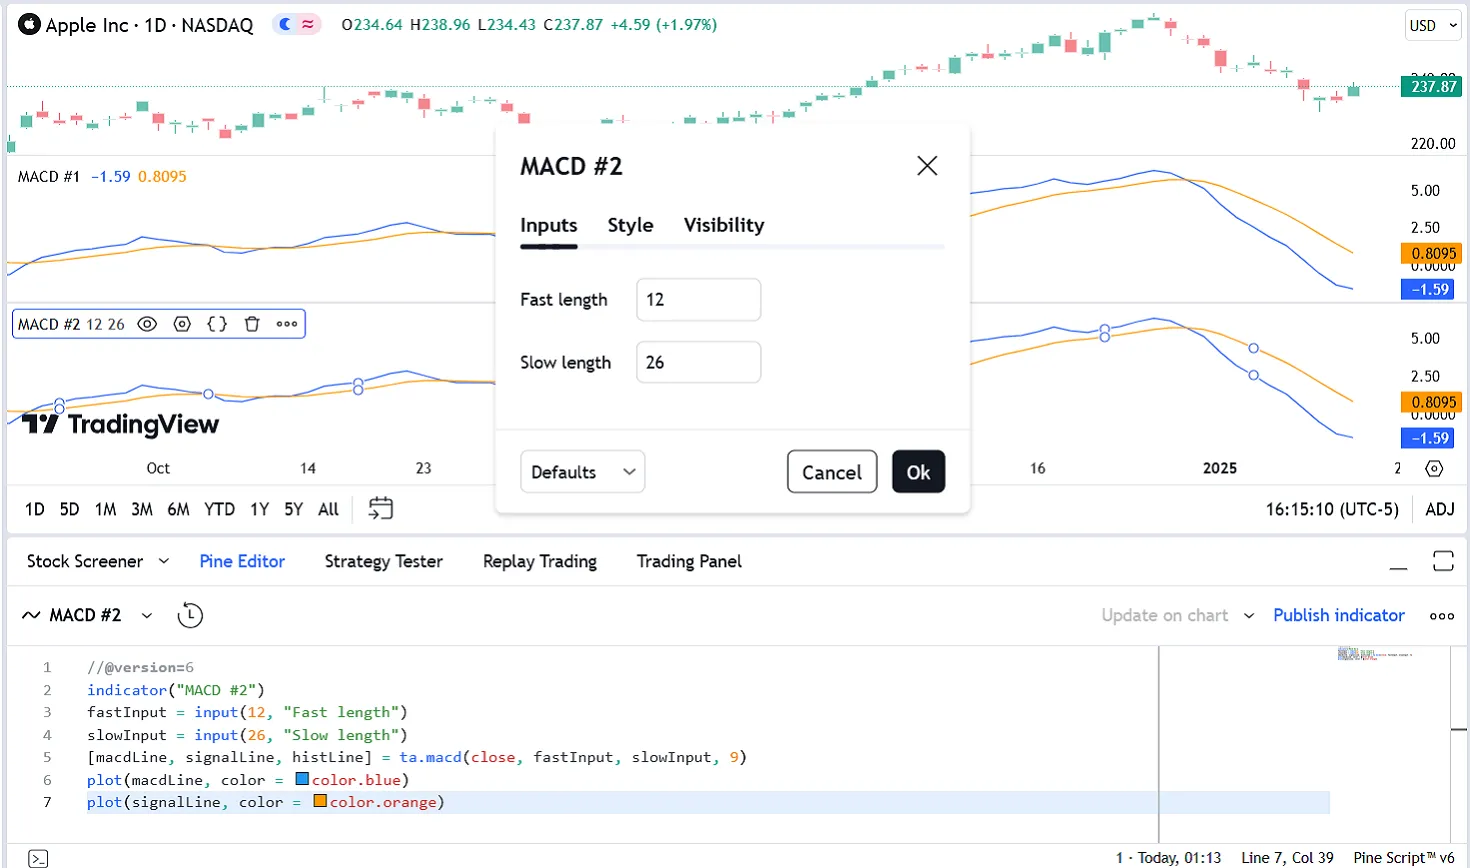
Our second Pine script is now running on the chart. If we double-click on the indicator’s name on the chart, it displays the script’s “Settings/Inputs” tab, where we can now change the fast and slow lengths used in the MACD calculation:

Let’s look at the lines that have changed in the second version of our script:
Line 2: indicator("MACD #2")
#1 to #2 so the second version of our indicator displays a different name on the chart.
Line 3: fastInput = input(12, "Fast length")
12 and the input field’s label is "Fast length". When we change the value in the “Inputs” tab, the fastInput variable updates to contain the new length and the script re-executes on the chart with that new value. Note that, as our Pine Script Style guide recommends, we add Input to the end of the variable’s name to remind us, later in the script, that its value comes from a user input.
Line 4: slowInput = input(26, "Slow length")
fastInput in the previous line, we do the same for the slow length, taking care to use a different variable name, default value, and title string for the input field’s label.
Line 5: [macdLine, signalLine, histLine] = ta.macd(close, fastInput, slowInput, 9)
= sign. Note that two of the values we pass to the function are the “input” variables containing the fast and slow lengths (fastInput and slowInput).
Lines 6 and 7: plot(macdLine, color = color.blue) and plot(signalLine, color = color.orange)
Our second version of the script performs the same calculations as our first, but we’ve made the indicator more efficient as it now leverages Pine’s built-in capabilities and easily supports variable lengths for the MACD calculation. Therefore, we have successfully improved our Pine script.
Next
We now recommend you go to the Next Steps page.