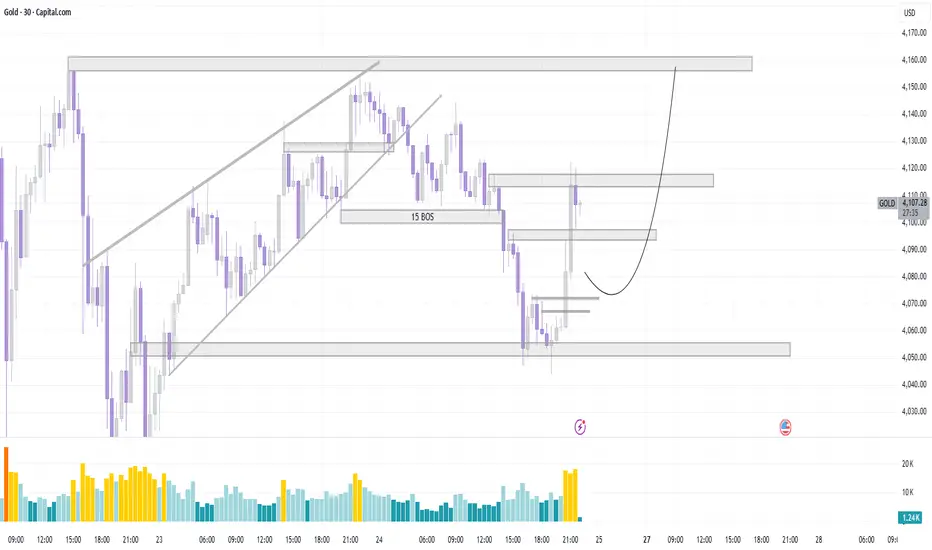
🔍 Technical Overview
Structure: The market previously formed a bearish structure, confirmed by a Break of Structure (BOS) labeled near the 15-min level.
Recent Move: Price made a strong impulsive bullish push upward, showing a clear change in short-term momentum.
Volume Spike: Noticeable increase in volume during the breakout — this often signals smart money entering the market or short covering.
📈 Current Scenario
Support Zone (Demand Area): Around 4,090–4,095, marked as a potential retest area where price could pull back before continuing higher.
Resistance Zones:
Minor resistance near 4,115–4,120
Major resistance / liquidity zone around 4,165–4,175
Projection: The curved arrow suggests a bullish retracement scenario — a pullback into the 4,090–4,100 area followed by continuation to the 4,170 zone.
🧭 Trading Idea
Bullish Bias as long as price holds above 4,085 (previous breakout base).
Look for:
Pullback entry: around 4,095–4,100
Target 1: 4,130 (intra-day resistance)
Target 2: 4,170 (major liquidity area)
Invalidation: If price breaks below 4,080, structure may shift bearish again.
Wyłączenie odpowiedzialności
Informacje i publikacje przygotowane przez TradingView lub jego użytkowników, prezentowane na tej stronie, nie stanowią rekomendacji ani porad handlowych, inwestycyjnych i finansowych i nie powinny być w ten sposób traktowane ani wykorzystywane. Więcej informacji na ten temat znajdziesz w naszym Regulaminie.